First steps with 3D in Flash
March 24th, 2011
Building 3D games and apps in general might look like a big step for developers, who did only 2D programming before. The aim of my 3D tutorial series is to show you, that it’s pretty straightforward to start thinking in 3 dimensions.
(Try CubeRotator app)
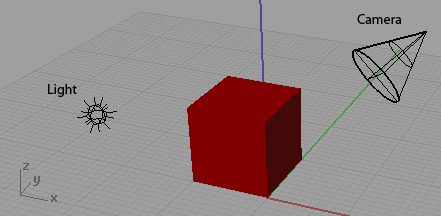
As a 3D programmer you usually combine following things together:
- View/Scene
- Camera
- 3D objects
- Materials
- Lights
- Shadows
- Physics
- Animations
- Shaders
- e.g. 800×600 rectangle
- primitives (Cube, Plane, Sphere)
- models (imported from file via Collada, 3DS, etc.)
- 3D objects are placed in a 3D container
- color fill
- textures/bitmaps
- environment materials and other advanced or intelligent materials
- Directional
- Point light
- Omni light
- little programs that can change visual look of models by changing geometry (vertex shader) or pixels on a material (fragment shader), shaders are very widely used in 3D programming and you can use Adobe Pixel Bender 3D to create them
All currently available Flash 3D engines are slightly different in terms of API, but learning one over the another doesn’t take long - differences are mainly in the features and speed of development - some provide less features, but it’s easier to work with them, others are more powerful, but take more time do something. All in all - pick the one that suites you most:
- Away3D
- Alternativa 3D
- Flare3D
- Sophie3D
- Yoghurt3D
- Minko
(some of them have Molehill versions already available)
Let’s create a simple scene with a red box, watching it from top - visible as a square.

Alternativa 3D 7.6 code: (run example | source)
public function Alternativa1()
{
	camera = new Camera3D();
 	camera.view = new View(stage.stageWidth, stage.stageHeight);
	camera.z = -500; // zoom out
	addChild(camera.view);

	container = new Object3DContainer();
	container.addChild(camera);

	cube = new Box();
	cube.setMaterialToAllFaces(new FillMaterial(0xFF0000));
	container.addChild(cube);

	stage.addEventListener(Event.ENTER_FRAME, onEnterFrame);
}

protected function onEnterFrame(event:Event):void
{
	camera.render();
}
Away3D 4 Broomstick (Molehill): (run example | source)
public function Away1()
{
	view = new View3D();
	view.camera.z = -500; // zoom out
	addChild(view); // add to the sprite

	container = new ObjectContainer3D();
	view.scene.addChild(container); // add to scene

	cube = new Cube()
	cube.material = new ColorMaterial(0xFF0000)
	container.addChild(cube); // add to container

	stage.addEventListener(Event.ENTER_FRAME, onEnterFrame);
}

protected function onEnterFrame(event:Event):void
{
	view.render();
}
Flare3D code: (run example | source)
public function Flare1()
{
	scene = new Scene3D(this);
	scene.camera.setPosition( 0, 0, -50 ) // zoom out

	cube = new Cube();
	cube.setMaterial(new FlatColorMaterial("red",0xFF0000));
	scene.addChild(cube);

	// see that there is no need for calling render() in Flare3D
}
As you can see, it’s basically same approach, just with little differences. Of course more differences come with more code written, just pick one that is better for you.
Try adjusting camera position:
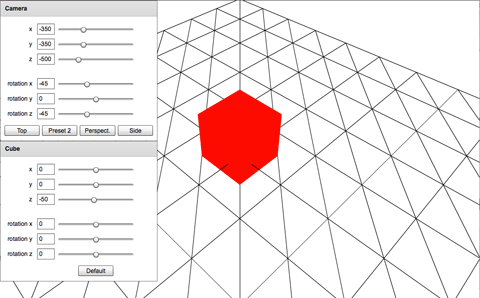
Open CubeRotator (simple app, that helps you understand how position and rotation work)
Away3D code:
view = new View3D();
view.camera.z = -500;
view.camera.y = -350;
view.camera.x = -350;
view.camera.rotationX = 45;
view.camera.rotationY = 0;
view.camera.rotationZ = -45;
addChild(view); // add to the sprite
*Note that all frameworks are slightly different with +/-
*For instance in Flare3D camera.rotationX will be -45, not 45. In Alternativa you will be setting a radian value.
We will do more stuff in the next tutorial. Loading models, rotations, camera hovering, lights, materials, and so on. I will keep these tutorials short, but focused on particular issues.
Examples and Sources
Flash game Machinarium currently #3 in Mac App Store
March 23rd, 2011
Amanita Design from Czech Republic is designing adventure Flash games since ages. You might remember some of their titles like Samorost, Samorost 2, Questionaut and so on.
What’s even better is that you can now get their latest game Machinarium in Mac App Store for $9.99 by the end of the March.
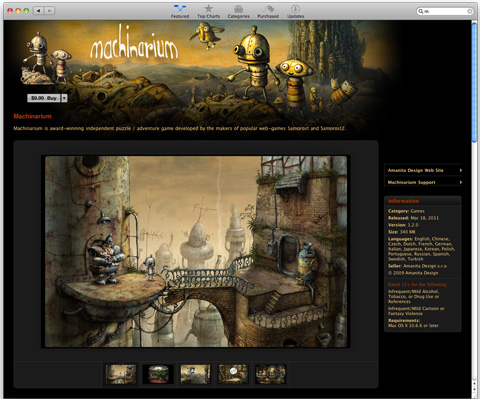
It’s currently number 3 under Top Paid Games - right after Angry Birds and Angry Birds Rio.
Personally I am looking forward to more Flash games available in Mac App Store, and imagine “Molehill” ,)
Here are some tips and tricks for uploading your game to the Mac App Store by Gary Rosenzweig, who has his Gold Strike in Mac App Store since day 1.
Introducing M2D - GPU accelerated 2D framework for Flash ‘Molehill’ API
March 9th, 2011
Update 3/24/2011: The framework source update and optimization - read more here (*Ely Greenfield blog)
 I am pretty sure that most of you are familiar with ‘Molehill’ - the new 3D API for Flash Player that enables GPU acceleration. Some people were wondering if this is just for 3D. The good news is that you can actually accelerate 2D graphics as well by rendering them on a stage3D instead of on the stage (DisplayList). It’s a little bit tricky, but definitely possible.
For instance, have a look at this demo - http://www.bytearray.org/wp-content/projects/molehill2d/molehill/ - the 2D graphics are rendered on GPU via Molehill.
But if you look at the code of this example and are not really coming from an OpenGL or DirectX world, it might take too long for you to pick it up.
To make it easier for you, Ely Greenfield wrote a framework called M2D, which is available here at github.
Features:
- render embeds
- animate spritesheets
- position, rotate objects
- particles
Kudos to Ely! I mean, this is really a big thing for 2D Flash games. Now you can render thousands of sprites with 60 FPS easily and smoothly and I am looking forward to seeing games using it.
I have forked Ely’s original M2D and added a RenderScene class and a Physics class that uses Box2D C++ Alchemy port. RenderScene is a simplified API for using M2D, which will fit most of your use cases and is easy to use for everyone.
How does it work?
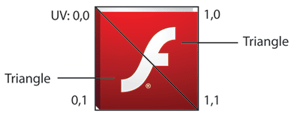
In 3D there are a couple things available to you - geometry (in our case triangles), textures and shaders.
To actually display an image - you render two triangles per a rectangle and then you upload a bitmap to it with correct UVs.
Can I accelerate DisplayObjects from Flash DisplayList?
Yes, you certainly can. The only thing is that currently it supports only static DisplayObjects, but MovieClip support is planned for the future. Animated sprites are currently supported via SpriteSheets - there is a tool that can help you to easily convert SWF to a PNG SpriteSheet - check out Zoë by Grant Skinner.
Future plans
- Documentation
- Mouse Events - there is currently no framework support for mouse events
- Animated MovieClips - animations can be done via SpriteSheets
- Optimizations - we are pretty sure that there will come numerous optimizations in the future by the community
- ATF support (Adobe Texture Format)
Open Source Project
The framework is provided for public domain “as is” with no guarantees, you may use it in your own commercial projects for free, fork it, change it, upgrade it. We are looking forward to hearing from the community about new updates, projects using M2D and proposals for the future versions.
The API
// create RenderScene - the sprite which renders Actors to Stage3D (GPU accelerated layer)
scene = new RenderScene(800,480);
addChild(scene);

// Add rectangle 100x100 px
var rect:Actor = scene.addRect(100,100);
rect.x = 100;
rect.y = 100;
rect.rotation = 10;

// Add embedded image
var image:Actor = scene.addImageEmbed(imageEmbed);
image.x = 300;
image.y = 100;
image.rotation = 45;
Examples
M2D HelloWorld
Simple Physics Game with Box2D
Simple Mouse Click Events
Animated Sprite sheets
Particles
Driver Test
15×10 sprites
40×40 sprites
Animation with TweenMax
Note: you need the Flash Player Incubator build that support Molehill API. Get it here. Also there might be a problem with GPU acceleration in Chrome currently - please try in another browser.
Download with libs
M2DSamples.zip
(including M2D.swc and Box2DAlchemy.swc and helper classes RenderScene.as and Physics.as)
M2D Source
https://github.com/egreenfield/M2D (download it, fork it, bring new ideas, we are looking forward to hearing from you)

