Videotutorial: Controlling the desktop with your mobile device via P2P
June 1st, 2011
Last year I wrote two tutorials connected with local network connections via P2P:
MAX Racer Remote Device Controller in AIR for Android
and
Local Flash Peer-to-Peer Communication over LAN (without Cirrus/Stratus)
Right now you can watch the video tutorial showing how to do this:
Note that such application can run on iOS, BlackBerry Tablet OS and Android.
MAX Racer Remote Device Controller in AIR for Android
November 25th, 2010
Quick heads-up my friends. When we first demoed MAX Racer, we have previewed initial support for USB Steering Wheel, etc. This support is a sneak peek feature in Flash Player, not available right now.
This really needs you have one of these devices at home. So we were thinking about more lightweight way of controlling the game and device or mobile phone is ideal for this.
I’ve built a little app in Flex Mobile “Hero” for AIR for Android, that controls the game by sending accelerometer, speed info, brake and so on using local P2P connection over WIFI.
Check the video how it works:
Read the rest of this entry »
P2P Gaming Libs from my MAX 2010 session
November 24th, 2010
Update 3/18/2011: Source-code is available here: https://github.com/tomkrcha/RealtimeGameLib
Update 11/28/2010: Library now accepts variable group name, so you can create more instances. Download updated library below. Example: var game:P2PGame = new P2PGame(serverAddress,groupName);
Lot of you guys are asking for libs I’ve used in my Adobe MAX 2010 session Building P2P Multiplayer Games.
It’s still work in progress, but you can basically grab SWC libraries here with example.
I don’t want to publish source now as it needs several changes, refactor, comments, etc. But source-code should be available soon ![]()
This library has been used for MAX Racer without no change. So it’s kickass tested stuff! But not completely finished and documented yet. So this is the disclaimer, I do not provide any guarantees.
If you want to start playing with it, go ahead. Comments are highly welcome!
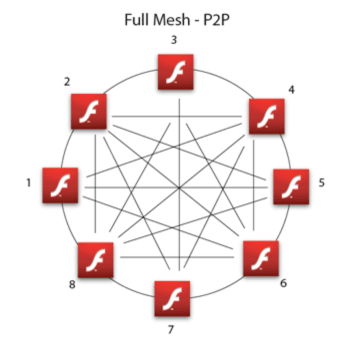
This engines creates a full mesh network via DIRECT_CONNECTIONS NetStreams among all connected users. Thanks to that, you get lowest latency possible and it’s highly suitable for realtime gaming.
Building P2P Multiplayer Games at Adobe MAX 2010
November 12th, 2010
The recording of my session from Adobe MAX 2010, where I briefly explain some tips and tricks I’ve learned during MAX Racer development.
Link to session recording (better view, with navigation)
Available on Adobe TV as well:
Slides (PDF) available for download here.
Libraries and other sources will follow.
Resolving “NetGroup.Connect.Rejected” or when your Flash P2P apps stop working
November 2nd, 2010
I just ran into a problem with NetGroup.Connect.Rejected, my FMS4 server was running ok - I have even tried Cirrus/Stratus and I was still getting this error on demos, which were properly working before.
OK - so what is this error about?
It’s all about your Flash Player security and it’s basically telling you that you have denied access to some source. This happens, when you start developing apps on different PC and someone before you denied to use P2P or similar.
Solution:
1. Go to Global Settings

2. delete all or specific P2P settings in Global Settings

3. run your application again (it should be in browser, had sometimes problems with standalone apps, where dialog didn’t appear)
this dialog should appear. Click Allow and better Remember.

Don’t forget that these settings are inherited to all versions of Flash Player you have on your PC, even to betas or prereleases.
Good Luck!