Directed Routing Explained in Flash 10.1 P2P
June 4th, 2010
Directed Routing enables you to send data to a specific client in the peer-to-peer group (NetGroup). It requires stable and correct topology to work well - still it’s very useful.
There has been already something written about directed routing. But I’d like to share with you much more.
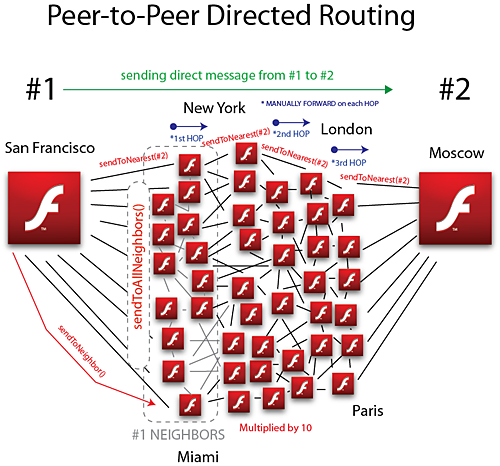
First, let me explain you which methods does what. You have basically three main functions sendToNearest, sendToNeighbor and sendToAllNeighbors. See image below.

Image: Peer-to-Peer Directed Routing in Flash Player 10.1 [Bigger image]
Continue reading to understand how it all works.
Read the rest of this entry »
Simple chat with P2P NetGroup in FP 10.1
February 9th, 2010
Watch videotutorial of creating P2P Chat with NetGroup in FP 10.1
 This tutorial explains total basics of using P2P/RTMFP Groups in Flash Player 10.1. We are going to build simple multi-user chat using RTMFP Posting - all data will be transferred over P2P! For this purpose we use recently updated (22 Jan 2010) Adobe Cirrus - rendezvous service.
Updated: 4:37 PM Feb 9 2010
Final demo: Try (run in few browsers) | Download source
Prerequsities:
- Flash Player 10.1
- UDP enabled network (you can’t be behind firewall, which blocks UDP)
- Flash Builder 4
- Cirrus developer key - Get one here if don’t have already. You have to login using your Adobe credentials to get it.
- playerglobal.swc for Flash Player 10.1
Step 1: Create new Flex 4 project
File -> New -> Flex Project
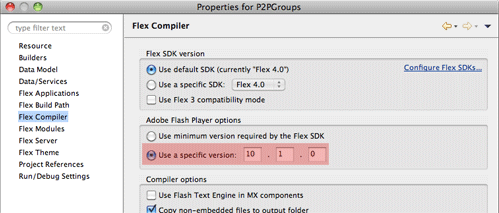
Link new playerglobal.swc (FP10.1 API) to your project in Project Properties and set compiler version in Flex Compiler to 10.1.0

Step 2: Connect to Cirrus
First of all we need to setup NetConnection to Adobe Cirrus. That’s easy part.
private const SERVER:String = "rtmfp://p2p.rtmfp.net/";
private const DEVKEY:String = "YOUR-DEVELOPER-KEY";
private var nc:NetConnection;

private function connect():void{
	nc = new NetConnection();
	nc.addEventListener(NetStatusEvent.NET_STATUS,netStatus);
	nc.connect(SERVER+DEVKEY);
}
Step 3: Setup NetGroup
We need to setup P2P group and connect to it. GroupSpecifier is a class, which let’s you to define all the parameters of the group. First you give it a name - in this case “myGroup/g1″. Then you set it to use serverChannel, to let it communicate with Cirrus. Finally we enable Posting. That’s all you have to do to define the P2P Group.
Then we have to define the actual NetGroup. groupspecWithAuthorizations() returns String - it’s a group identifier. Now you probably ask, what’s the difference between groupspecWithoutAuthorizations() and groupspecWithAuthorizations(). If you set a posting or multicast password, the one “with” can post or multicast, the one “without” is receive-only.
private function setupGroup():void{
	var groupspec:GroupSpecifier = new GroupSpecifier("myGroup/g1");
	groupspec.serverChannelEnabled = true;
	groupspec.postingEnabled = true;

	netGroup = new NetGroup(nc,groupspec.groupspecWithAuthorizations());
	netGroup.addEventListener(NetStatusEvent.NET_STATUS,netStatus);


	user = "user"+Math.round(Math.random()*10000);
}
Step 4: Handle NetStatusEvent
We are going to handle at this step just three events. When we connect to Cirrus we setup a group. When we connect to NetGroup we reflect it to UI and and when we receive a Posting message we show it in chat history.
private function netStatus(event:NetStatusEvent):void{
	trace(event.info.code);

	switch(event.info.code){
		case "NetConnection.Connect.Success":
			setupGroup();
			break;

		case "NetGroup.Connect.Success":
			connected = true;

			break;

		case "NetGroup.Posting.Notify":
			receiveMessage(event.info.message);
			break;
	}
}
Step 5: Sending and receiving message
We have to put together a message object, which handles text, user name, sender ID. Sender ID is useful to have for direct posting. And we also convert NetConnection PeerID to GroupAddress - participant address in the group. When we post() message to a NetGroup, we just distribute it/broadcast it, but it does not come back to us. So that’s why we need to call receiveMessage as well - to display it in history text field.
private var seq:int = 0;
private function sendMessage():void{
	var message:Object = new Object();
	message.sender = netGroup.convertPeerIDToGroupAddress(nc.nearID);
	message.user = txtUser.text;
	message.text = txtMessage.text;
	message.sequence = seq++; // *to keep unique


	netGroup.post(message);
	receiveMessage(message);

	txtMessage.text = "";
}

private function receiveMessage(message:Object):void{
	write(message.user+": "+message.text);
}

private function write(txt:String):void{
	txtHistory.text += txt+"\n";
}
*Sequence: Very important thing - every different message must be unique, you can’t send same message twice. P2P rerouting mechanism will think it has already delivered that message - that’s why we are adding a sequence number - can be also random.
Step 6: Create UI
<s:TextArea left="10" right="10" top="10" bottom="40" id="txtHistory"/>
<s:TextInput x="10" id="txtUser" text="{user}" bottom="10"/>
<s:TextInput left="145" right="88" id="txtMessage" bottom="10" enter="sendMessage()"/>
<s:Button label="Send" click="sendMessage()" enabled="{connected}" bottom="10" right="10"/>
Step 7: Run it
